How to Install Led Strip Lights Outdoor for Your Patio?
Installing LED strip lights outdoors can transform your patio into a cozy oasis. According to outdoor lighting expert Mark Thompson, “LED strip lights outdoor create an inviting atmosphere for any space.” Choosing the right placement is vital. Consider lining the edges of your patio or wrapping them around railings for a soft glow.
When planning your installation, think about weather resistance. Not all LED strip lights outdoor are made for harsh conditions. Check the IP rating to ensure durability. Attention to detail during installation can enhance your outdoor experience. Ensure secure connections and proper insulation.
It might be tempting to rush through the process. However, taking your time can make a significant difference. Double-check your measurements and test the lights before finalizing everything. Properly installed LED strip lights outdoor can elevate your evenings spent outdoors, making them enjoyable and memorable.
Choosing the Right LED Strip Lights for Outdoor Use
Choosing the Right LED Strip Lights for Outdoor Use
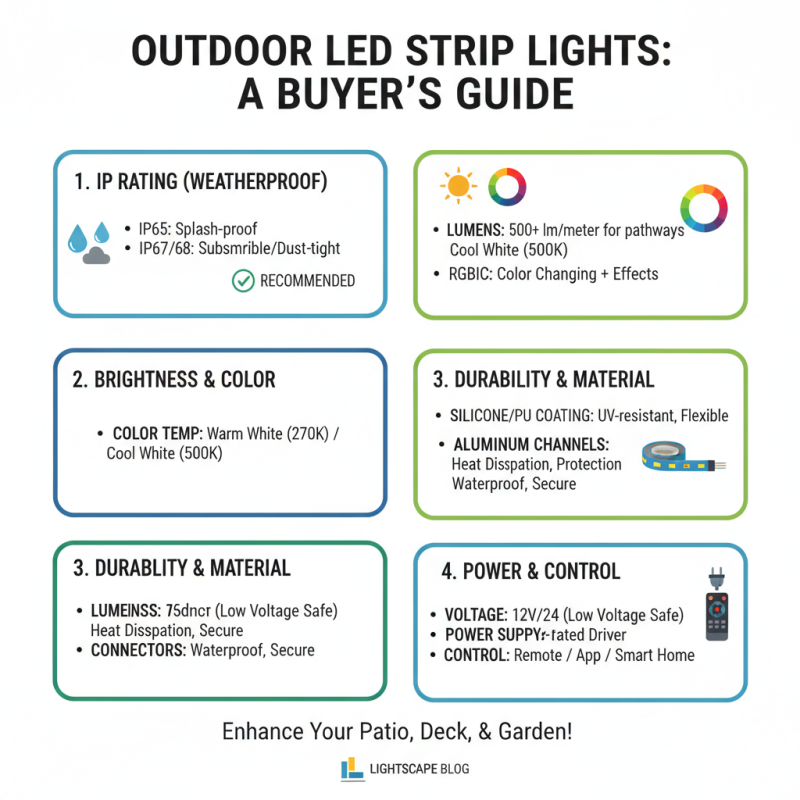
When selecting LED strip lights for outdoor spaces, consider the IP rating. An IP65 rating is ideal for outdoor areas, as it protects against dust and water. According to a report by the Lighting Research Center, properly rated outdoor LED lights can reduce energy costs by up to 75%. This statistic highlights their energy efficiency for extended outdoor use.
Brightness is another crucial factor. Look for lights that provide at least 300 lumens per meter. This brightness ensures that your patio is well-lit. Too dim, and the space feels uninviting. Overly bright lights can be harsh and uncomfortable. Aim for a balance to create an inviting atmosphere.
Tips: Before finalizing your choice, check color temperature. Warmer tones around 2700K create a cozy setting. Cool whites over 5000K may feel stark and clinical. Additionally, always account for the length of your patio. Measure accurately to avoid purchasing excess strips, which can lead to waste. Remember to think about the accessibility of power sources too.
Preparing Your Patio for LED Strip Light Installation
Preparing your patio for LED strip light installation requires careful planning. Start by cleaning your patio area thoroughly. Remove any debris, furniture, or plants that might obstruct the installation process. This step helps reveal the best spots for your lights.
Consider the layout of your patio. Measure the length of the areas where you want to install the lights. This will help you estimate how many strips you’ll need. Remember to think about the power source location as well. It's crucial that you can easily access an outlet or safely extend power to your lights.
Tips: Check the surface where you’ll place the lights. Some surfaces may require additional adhesive or support. Weather can also impact your LED lights. Make sure to choose outdoor-rated strips designed for exposure to heat, rain, or cold. Finally, take your time and don’t rush. This will lead to a better, safer installation.
Comparison of LED Strip Light Lengths for Outdoor Patios
Step-by-Step Guide to Installing LED Strip Lights Outdoors
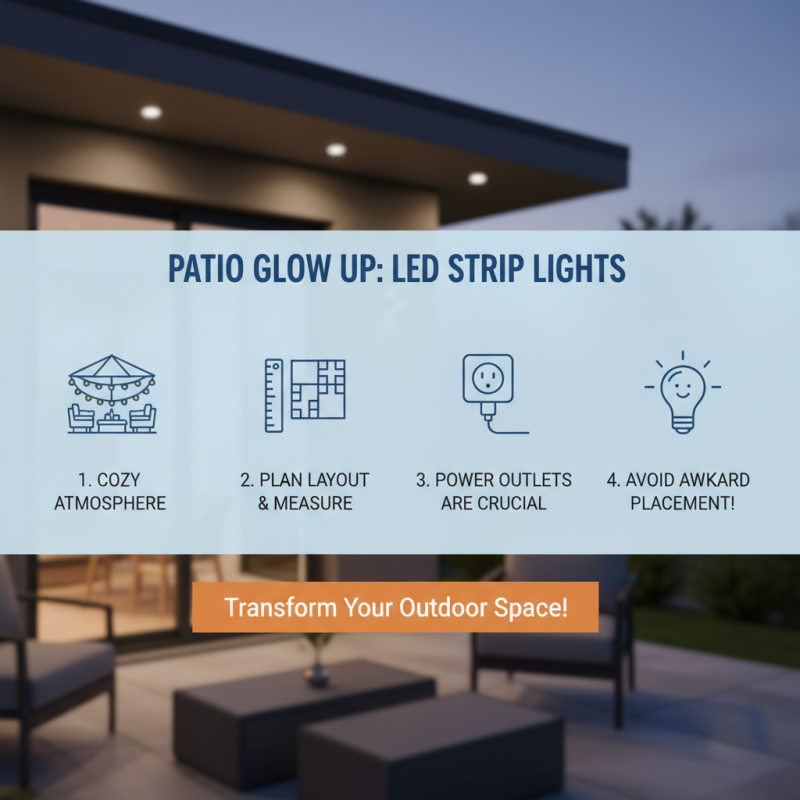
When decorating your patio, LED strip lights can transform the space. They create a cozy atmosphere. Plan your layout carefully. Measure your patio dimensions. Make sure to include power outlets in your plan. This step is crucial to avoid awkward placements.
Start by cleaning the surface. Dust and dirt can affect adhesion. You may need a longer strip than planned, so it's good to have some extra. Cut the strip according to your measurements. Use scissors on the designated lines. Testing the lights before final installation is wise. Don’t skip this step; faulty lights can waste time.
As you attach the strips, be mindful of corners. Avoid stretching them too much; this can cause damage. Sometimes the lights may not stick perfectly. Using clips can help secure them. If imperfections arise, a little patience may be needed. Adjustments can lead to a more polished final look. Enjoy your newly lit patio, but don’t forget there’s always room for improvement.
Ensuring Safety and Waterproofing for Outdoor LED Strips
Installing LED strip lights outdoors can enhance your patio’s ambiance, but safety is crucial. Waterproofing is the primary concern. Poorly sealed connections lead to short circuits. Use lights specifically designed for outdoor use. They come with protective coatings that resist moisture. Check the IP rating; look for at least IP65 for good waterproofing.
Before installation, inspect your patio area. Identify potential sources of water. Overhanging branches or nearby sprinklers can cause trouble. Consider elevation when placing your strips. Avoid low areas where water might pool. Keep the connections elevated and secured. Utilize heat-shrink tubing and silicone sealant on exposed ends. These additional measures can prevent damage.
Reflect on your installation technique. Are the strips properly attached? Loose ends can peel off over time. Ensure they are adhered securely to avoid detachment. If you encounter difficulties, don’t hesitate to adjust your plans. Sometimes repositioning lights yields better results. Safety and aesthetics can coexist; careful planning is key.
Tips for Maintaining and Enjoying Your Outdoor LED Lighting
When it comes to outdoor LED lighting, maintenance plays a crucial role. Regular check-ups help prolong the lifespan of your lights. Ensure that the connections are clean and dry. Dirt can cause malfunctions. Inspect your LED strips periodically. Replace any damaged sections promptly. This not only enhances safety but also keeps the aesthetic intact.
Also, consider the weather. Rain or humidity can affect the wiring. Using waterproof connectors can mitigate potential issues. If you notice dimming lights, the issue may be with the power supply. Adjustments might be needed.
To truly enjoy your outdoor lighting, create zones. Different colors can enhance mood. Using dimmers gives flexibility for various occasions. Sometimes, too much light can overpower the space. Balance is key. Experimenting with placements will yield the best results. Don’t hesitate to change your layout until it feels right.